As of July 17, 2017, QuickBooks Online API supports the OAuth 2.0 protocol for new developer accounts. Click here for more details on OAuth 1.0 and 2.0 for your account. This blog shows you how to generate OAuth 2.0 tokens and then call the QuickBooks Online APIs using the Postman app with OAuth 2.0. The following topics are included in this blog.
How to make authenticated calls in a few simple steps:
Create your Intuit Developer account, an app, and connect a QuickBooks Online sandbox.

Creating your Intuit Developer account automatically provisions a QuickBooks Online sandbox. It is filled with sample data, but more importantly for our exercise, it allows you to use your Intuit Developer credentials to authorize a connection between the sandbox and an app. You can access your sandbox account from here.
The following sections show you how to call QuickBooks Online endpoints programmatically using proper OAuth 2.0 tokens.
Create a QuickBooks Online app and get API keys
You can create an app from the developer portal here: https://developer.intuit.com/v2/ui#/app/dashboard

When you create an app, the Developer site creates API keys on your behalf. You are provided two sets:
- Development keys for connecting to your QuickBooks Online sandbox company
- Production keys for connecting to a QuickBooks Online production company.
Below, we use development keys to connect to a QuickBooks Online sandbox company.
Generate an OAuth 2.0 access token and refresh token for your sandbox account.
Intuit Developer provides an OAuth 2.0 playground that generates the OAuth 2.0 access token and refresh-token using the app’s API keys. But here, you learn how to generate the OAuth 2.0 tokens using Postman. In Postman, Select OAuth 2.0 in the Authorization tab.

Postman uses its own callback endpoint, https://www.getPostman.com/OAuth 2.0/callback, to serve the OAuth 2.0 Authorization code, effectively starting the Connect to QuickBooks workflow. This callback endpoint is registered as a Redirect URI on your app’s keys tab on the developer portal.

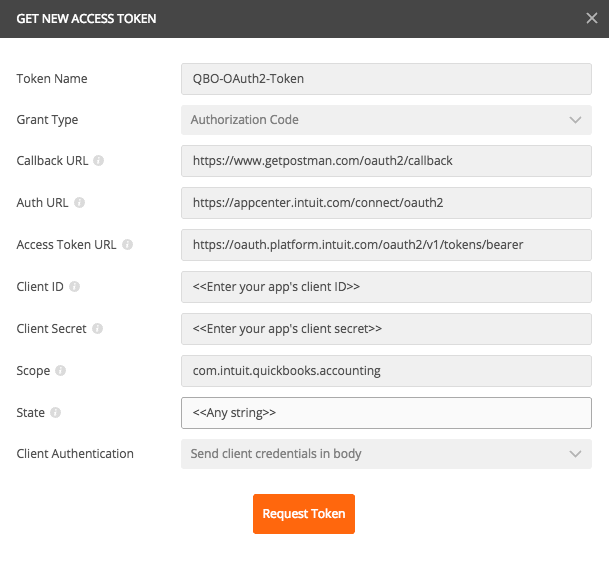
Now, configure OAuth 2.0 related variables in the Postman app for generating OAuth 2.0 tokens.
-
- Enter a name for the OAuth 2.0 tokens set. This example uses QuickBooks Online OAuth 2.0 token. For more details on OAuth 2.0, refer docs from here.
- Configure the Auth URL and Access Token URL as follows.
- Enter Auth URL as https://appcenter.intuit.com/connect/oauth2
- Enter Access Token URL as https://oauth.platform.intuit.com/oauth2/v1/tokens/bearer
- Enter Client ID and Client Secret from your app’s key tab that you created in the developer portal.
- Use ‘com.intuit.quickbooks.accounting ‘ as the scope. For more details on scopes, refer – OAuth 2.0 docs from here.
- State – Enter any string state that might be useful to your application upon receipt of the response. The Intuit Authorization Server roundtrips this parameter, so your application receives the same value it sent. To mitigate against cross-site request forgery (CSRF), it is strongly recommended to include an anti-forgery token in the state, and confirm it in the response. For more details, please refer – About anti-forgery state tokens.
- Choose ‘ Send client credentials in the body ‘ option for ‘Client Authentication’.
After entering these values, click the Request Token button. You are prompted to connect with your QuickBooks Online sandbox company. From the company selection screen, choose your QuickBooks Online company and authorize your app to generate OAuth 2.0 tokens.
After completing this OAuth 2.0 workflow, Access Token and Refresh Token have been generated under the name QBO-OAuth2-Token.
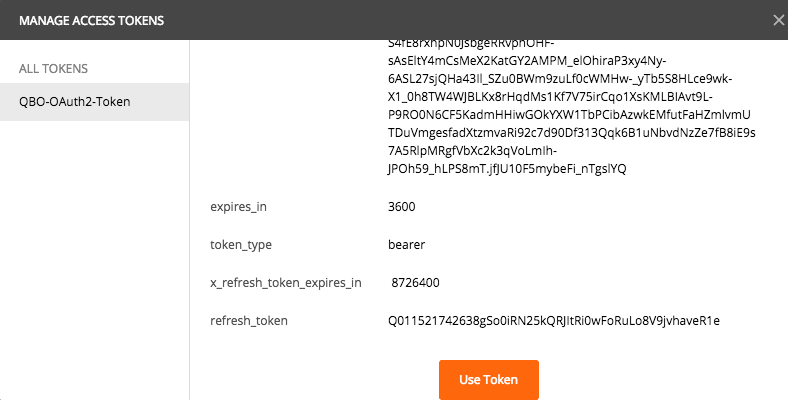
Continue to the next section to use these tokens to call QuickBooks Online APIs.
Call QuickBooks Online REST APIs using the Postman app and cURL.
Intuit’s OAuth 2.0 flow sends the QuickBooks Online RealmId as part of the callback URL params. Since the Postman app handles the callback, there is no way to get or parse the RealmId. As such, use any one of the following approaches to get the RealmId corresponding to the generated OAuth 2.0 tokens.
- Go to the following Sandbox page where all Companies, along with their RealmIds, are listed: https://developer.intuit.com/v2/ui#/sandbox.
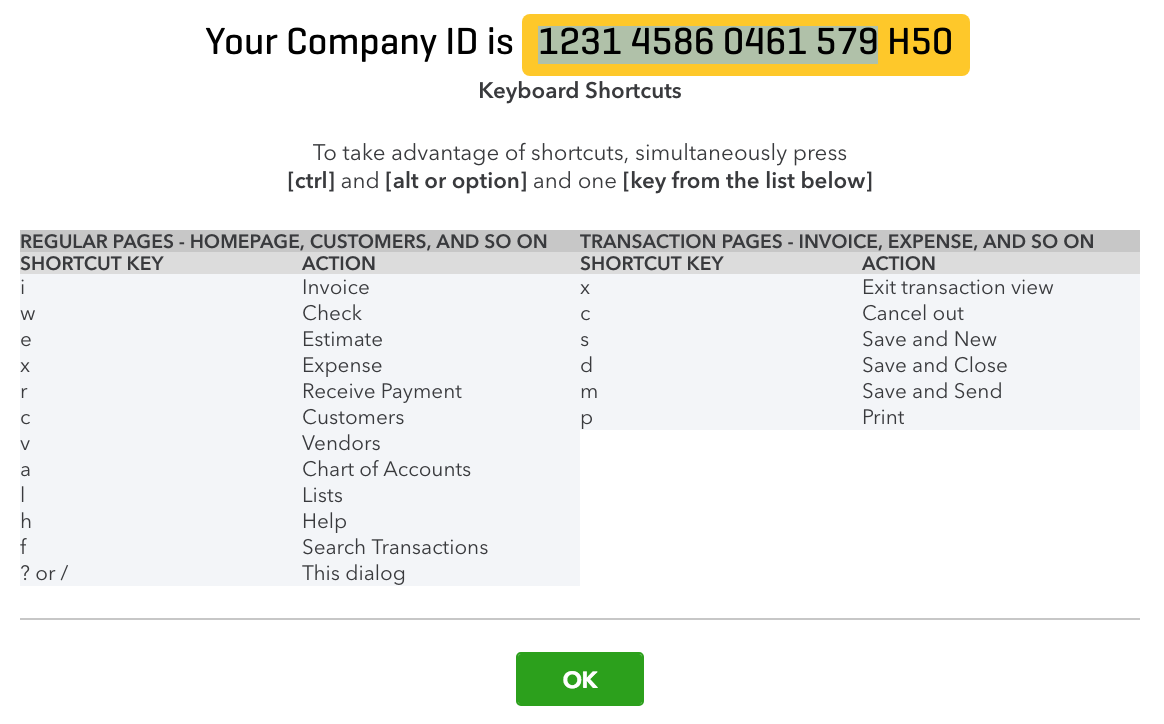
- Press CTRL-ALT-QUESTION MARK (?) on the keyboard from any screen inside a QuickBooks Online company. A modal window displays the RealmId associated with the QuickBooks Online account. Note: do not use the last portion of the CompanyId. In this example, the CompanyId is 123145860461579. You should ignore the last part(in this case, it is H50) of the CompanyId/RealmId. Also, remove the spaces from the CompanyId.
 Now that you have set up your sandbox account, obtained all necessary OAuth 2.0 tokens, and located the RealmId, you can try any QuickBooks Online REST API. The following section demonstrates three of the most frequently used API scenarios.
- Get details of the account that has Account.Id of 1.
- Get all customer records using the query endpoint.
- Create a customer.
To get started accessing the QuickBooks Online API using Postman:
- Select the API Authorization type as OAuth 2.0.
- Select QuickBooks Online OAuth 2.0 Token from the Existing Tokens section and click the Use Token button to start using them in calls the API endpoints.
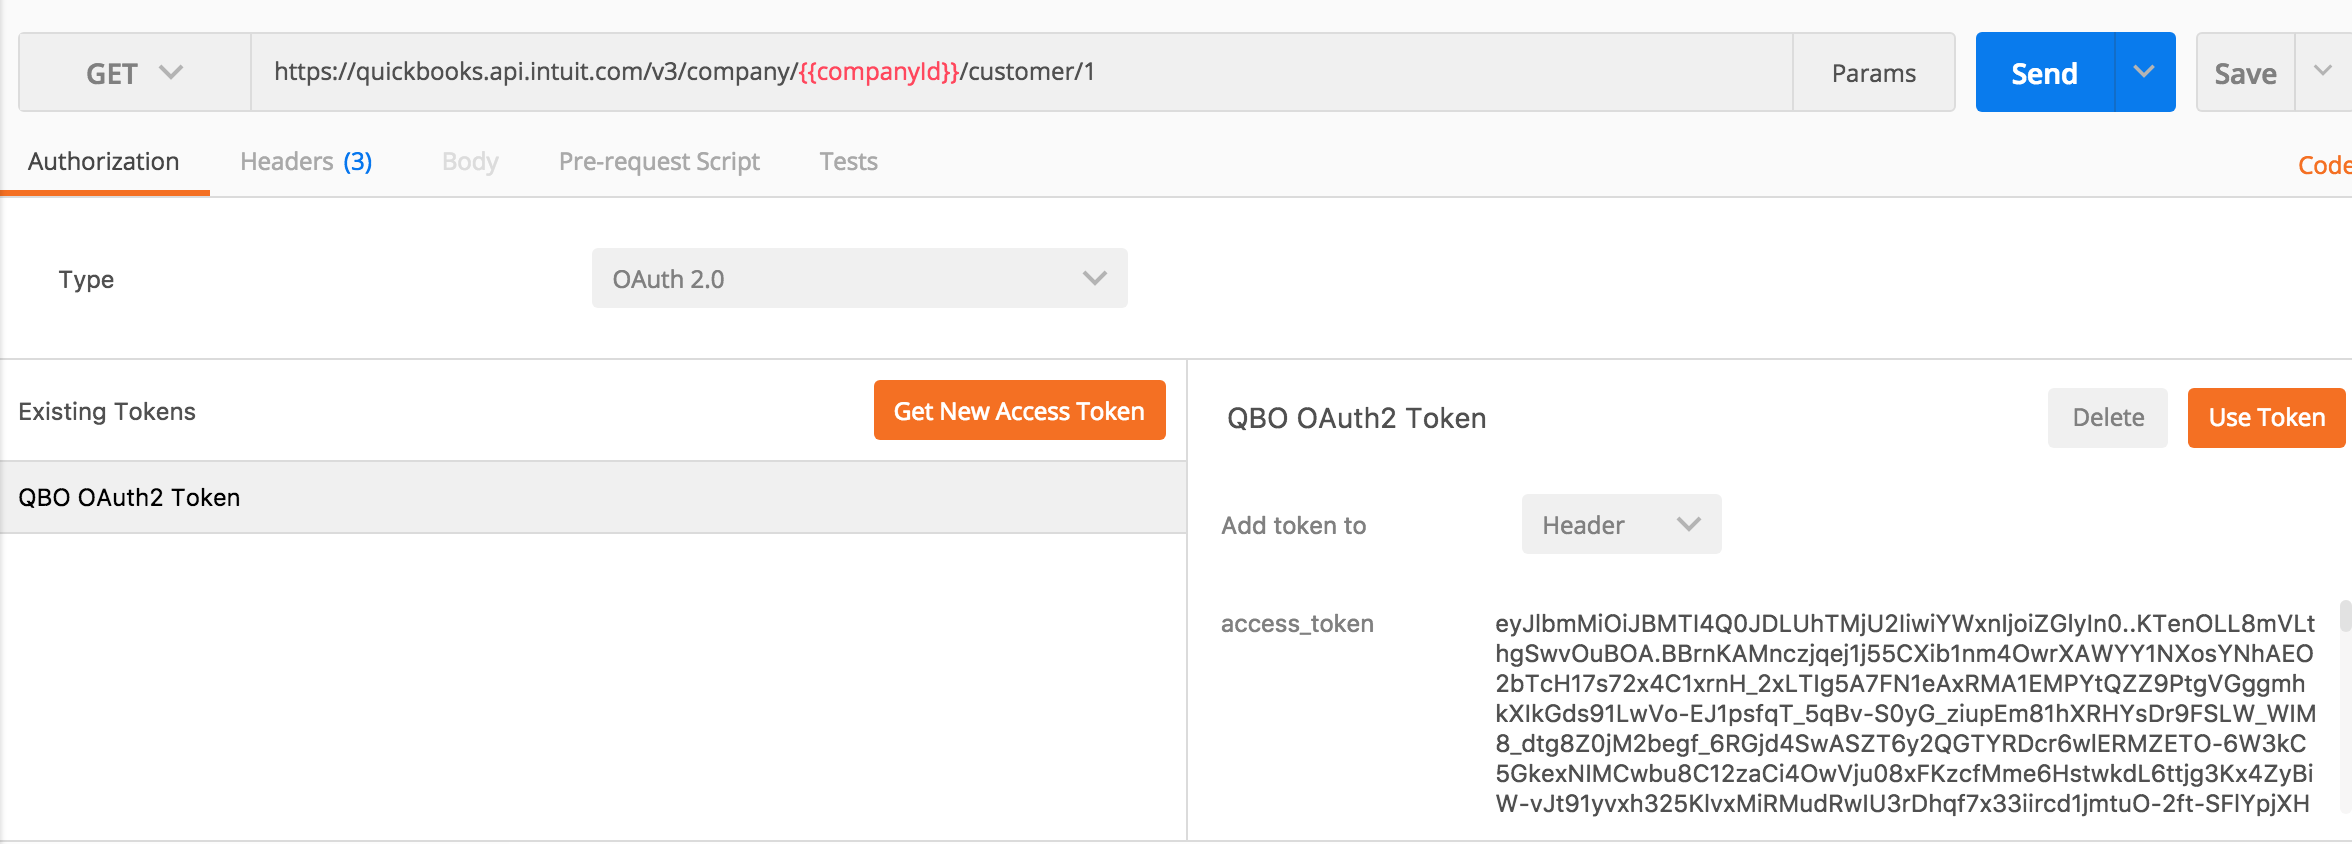
Now, you are ready to make your first QuickBooks Online REST API call.
Examples
The examples below make requests to your sandbox account. To test with your QuickBooks Online production account, use your production keys to generate the OAuth 2.0 header and change the API base URL in the endpoints below to https://quickbooks.api.intuit.com.
Example 1 – Fetching an account object by ID
In this first example, fetch the details of the QuickBooks Online account where Account.Id=1.
- Enter the following Account endpoint in Postman after replacing <companyId> with your QuickBooks Online sandbox company ID (realm ID).
- https://sandbox-quickbooks.api.intuit.com/v3/company/<companyid>/account/1
- Set accept header to application/json.
- Click the Send button.
The resulting JSON response code contains details of the account, as shown here:
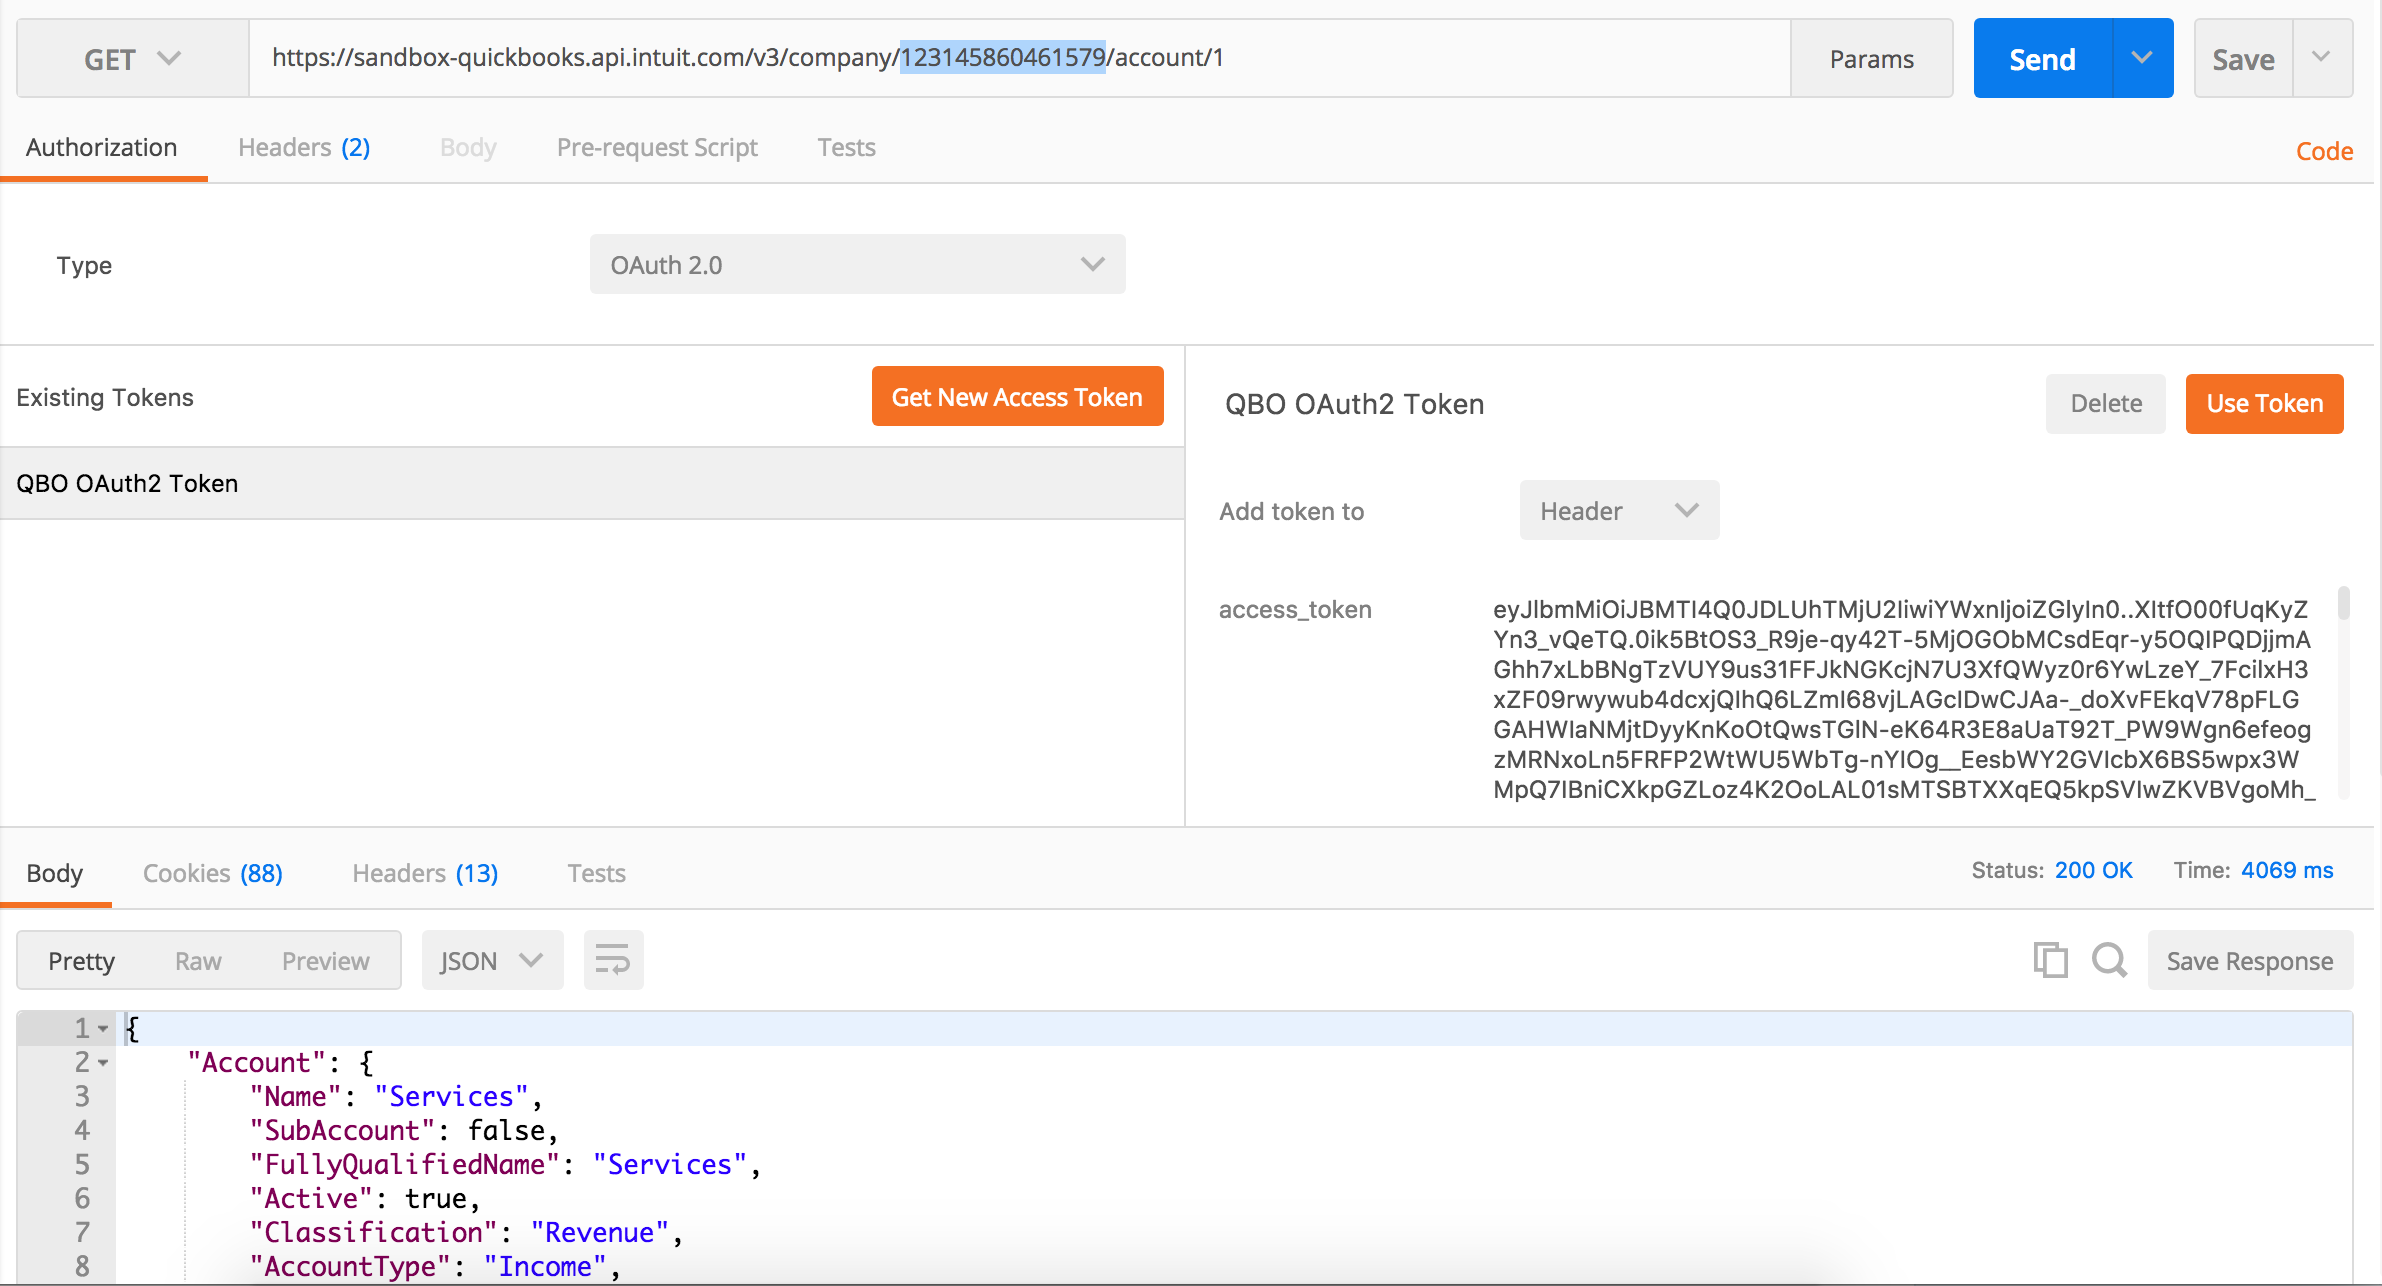
Select different languages from the Generate Code Snippets dropdown menu to see language specific code corresponding to the above API call.

Example 2 – Reading all customer objects
In this second example, fetch all customer objects from your QuickBooks Online sandbox company using the query endpoint.
- Enter the following query endpoint in Postman after replacing <companyId> with your QuickBooks Online sandbox company ID (realm ID).
https://sandbox-quickbooks.api.intuit.com/v3/company/<companyId>/query?query=Select * from Customer
- Set accept header to application/json.
- Click the Send button.
Enter the following query endpoint in Postman after replacing the <companyId> with your QuickBooks Online sandbox company ID (realm ID) and click the Send button.
https://sandbox-quickbooks.api.intuit.com/v3/company/<companyId>/query?query=Select * from Customer
In this case, we pass the Accept header as application/json to get JSON response. Here is a snapshot of a successful query API call showing the response payload.

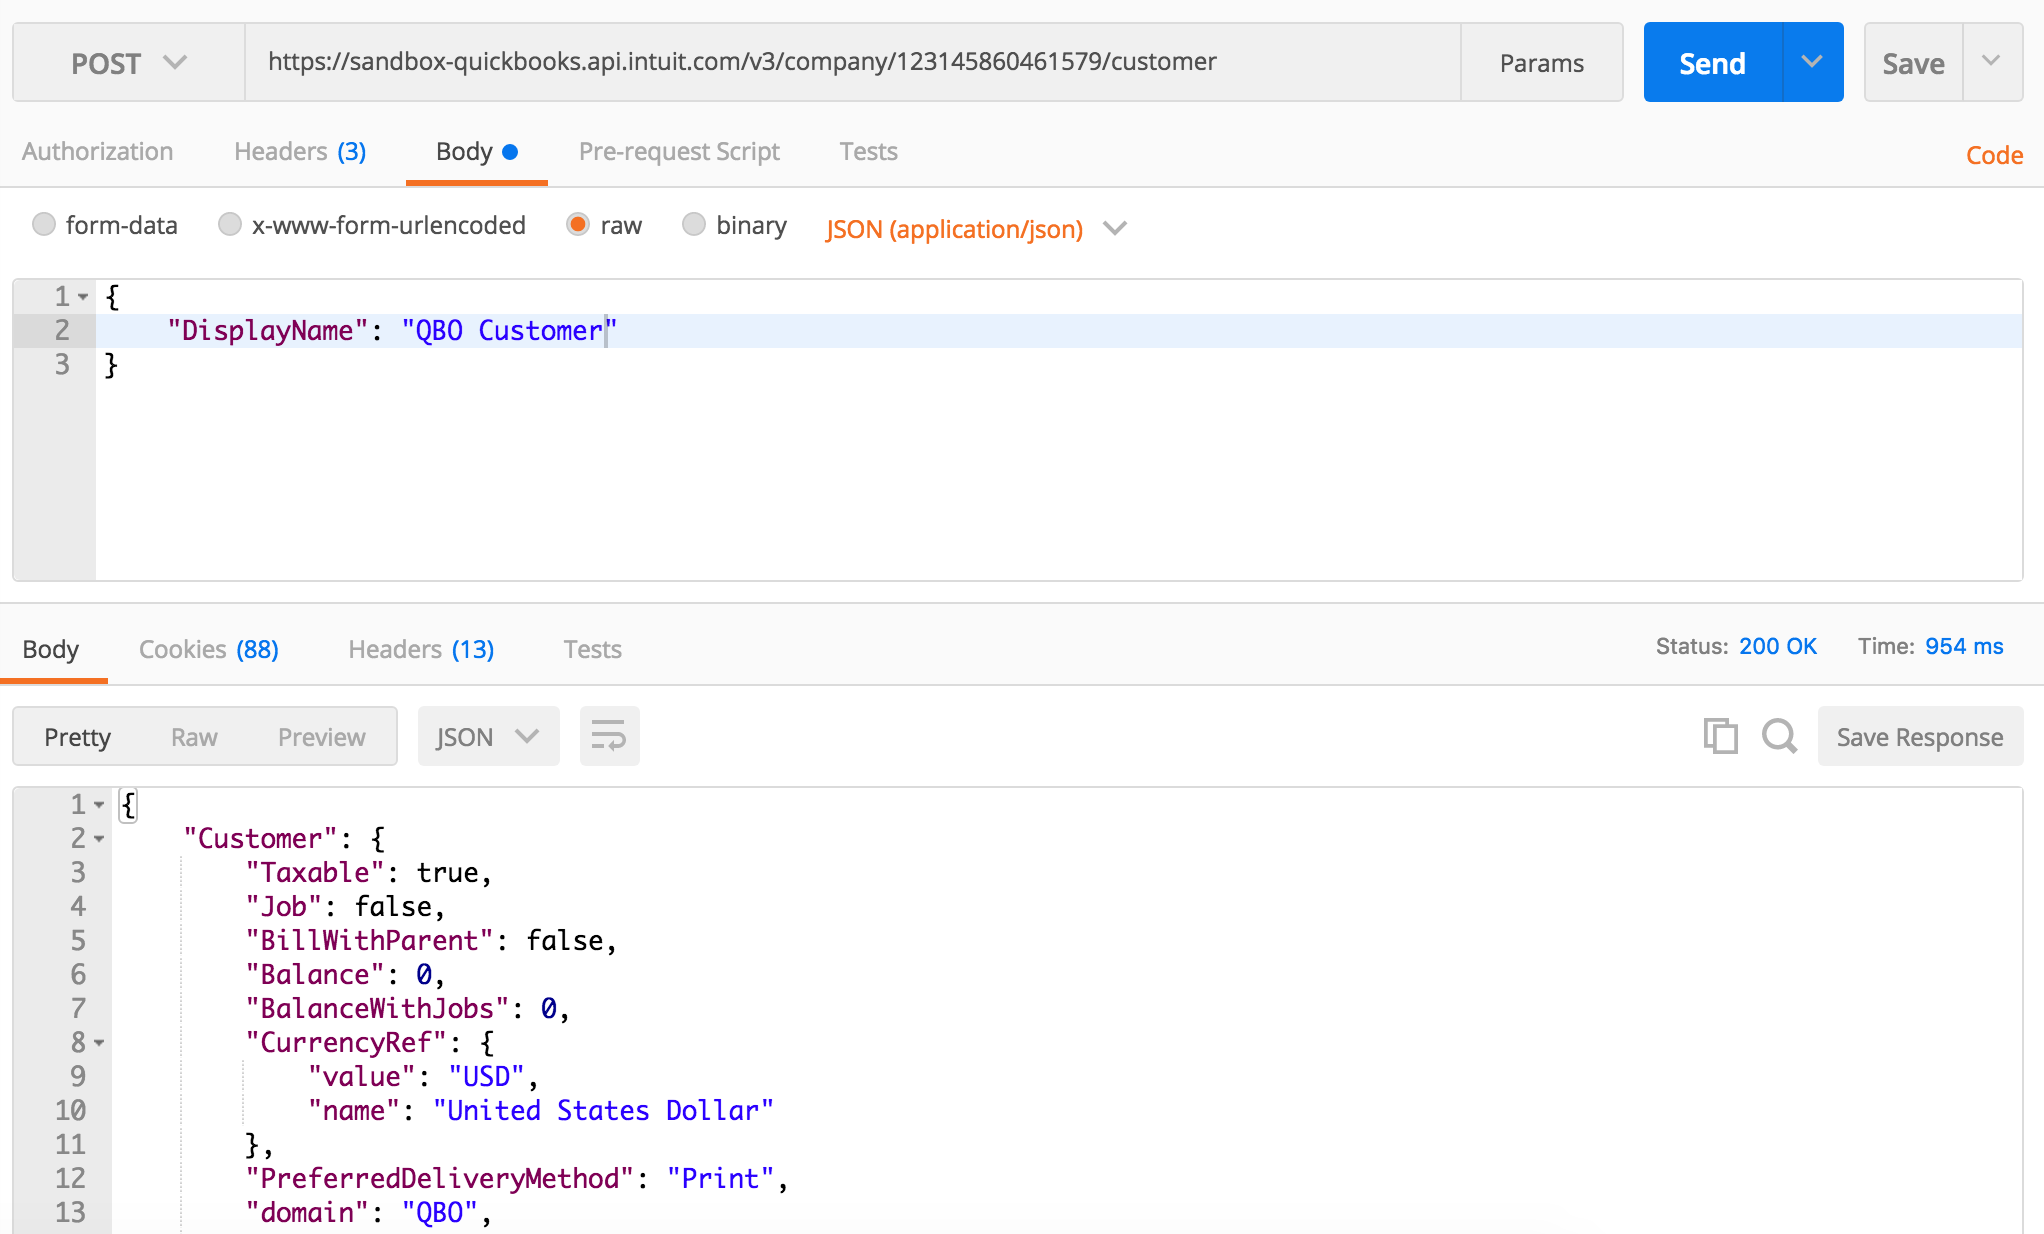
Example 3 – Creating a customer object
In this third example, create a customer object using QuickBooks Online APIs.
- Enter the following customer endpoint in Postman after replacing <companyId> with your QuickBooks Online sandbox company ID (realm ID):
https://sandbox-quickbooks.api.intuit.com/v3/company/<companyId>/customer
- Set accept header to application/json.
- Click the Send button.
For example, add the following header in Postman to pass a customer object in JSON format.
Content-type:application/json
{
"DisplayName":"QuickBooks Online Customer"
}
Here is a simple customer create payload, which you can try right away.
Summary
This blog demonstrates how to generate components of an OAuth 2.0 authorization header to make QuickBooks Online API calls to your sandbox account. Soon to be available: look for updated QuickBooks Online API’s Postman collection that works with OAuth 2.0, directly.
Learn more
- For more details on OAuth 2.0, such as generating a new access token using a refresh token, refer here.
- To call the APIs programmatically, leverage the official SDKs which take care of authentication, data serialization, and several other aspects of QuickBooks Online REST API calls.
- Links to sample programs that use the official SDKs for some basic use cases are found here.
Manas Mukherjee
Intuit Developer Group


Leave a Reply